普通下载
普通下载
LabVIEW类似于C和BASIC开发环境,但是LabVIEW与其他计算机语言的显著区别是:其他计算机语言都是采用基于文本的语言产生代码,而LabVIEW使用的是图形化编辑语言G编写程序,产生的程序是框图的形式。图形化的程序语言,又称为 “G” 语言。使用这种语言编程时,基本上不写程序代码,取而代之的是流程图或框图。它尽可能利用了技术人员、科学家、工程师所熟悉的术语、图标和概念,因此,LabVIEW是一个面向最终用户的工具。

LabVIEW 2015是美国国家仪器(NI)公司最新开发的程序开发环境,他集成了工程师和科学家快速构建各种应用所需的所有工具,内置中文操作界面,可以帮助工程师完成从设计到测试等一系列步骤以及开发大中小型系统的图形化编程平台。新版LabVIEW 2015通过更快的速度、开发快捷方式和调试工具来帮助开发人员更高效地与所创建的系统进行交互,帮助您更高效地解决当今的问题以及应对未来不断变化的挑战,可帮助您更快速、更有效地解决当前的问题以及具备未来创新的能力。
软件介绍:
LabVIEW是一种图形化的编程语言的开发环境,它广泛地被工业界、学术界和研究实验室所接受,视为一个标准的数据采集和仪器控制软件,在LabVIEW编程环境程序员可以很容易地创建小型应用程序,可以用它来编写复杂的算法或大规模的代码,先进的LabVIEW开发系统提供了创建独立应用程序的可能性。
安装步骤:
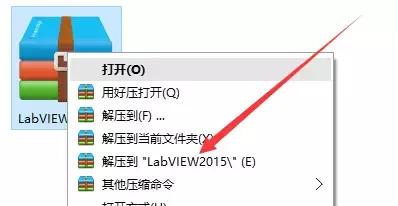
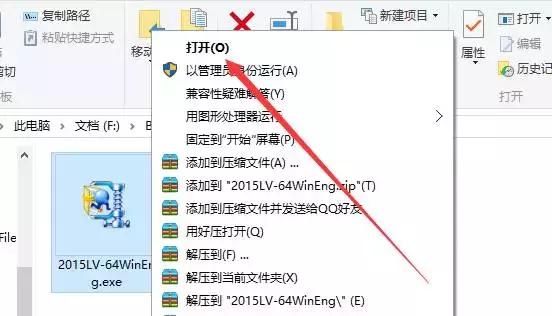
1、右击软件压缩包,选择解压到LabVIEW2015。
2、鼠标右击选择打开2015LV-64WinEng.exe文件。
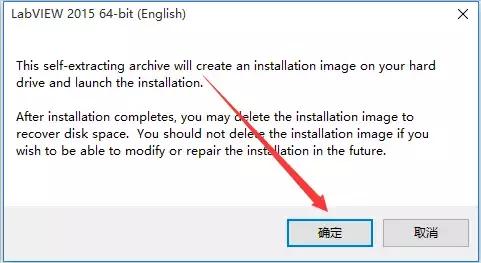
3、点击确定。
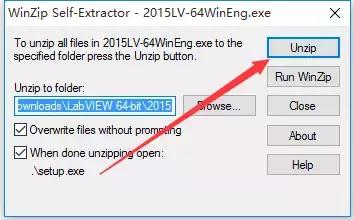
4、点击Browse解压文件。
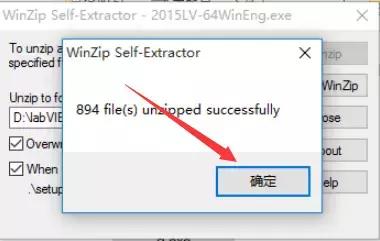
5、点击确定
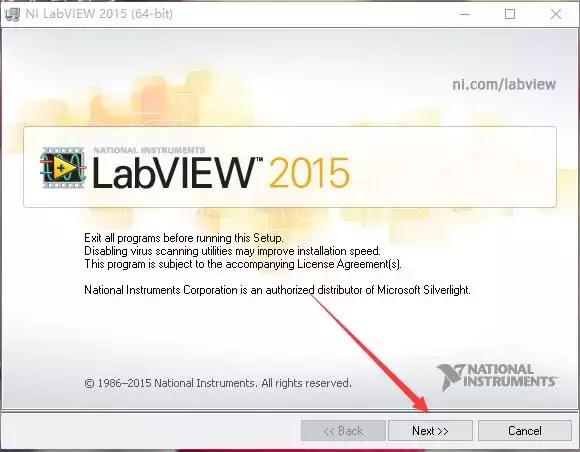
6、点击Next。
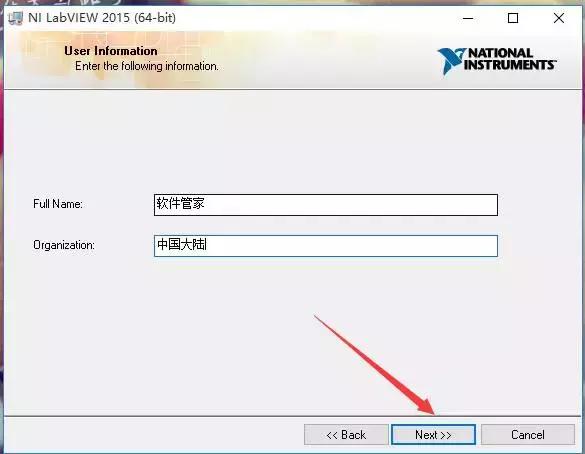
7、任意填写信息,点击Next。
8、点击Next。

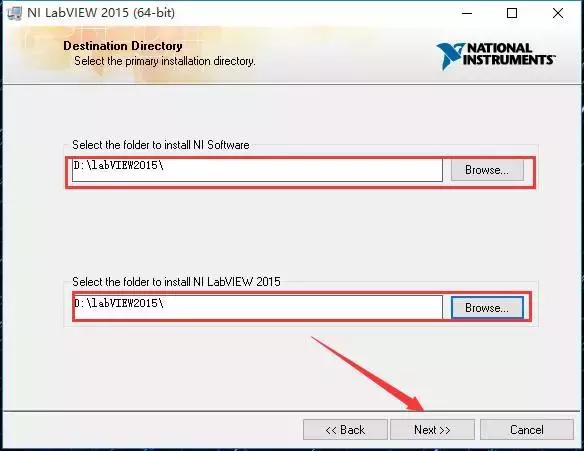
9、点击Browse更改安装路径,建议安装到除C盘以外的磁盘,可在D盘或者其他盘创建一个2015LV-64WinEng文件夹。然后点击Next。
10、点击Next。
11、点击Next。
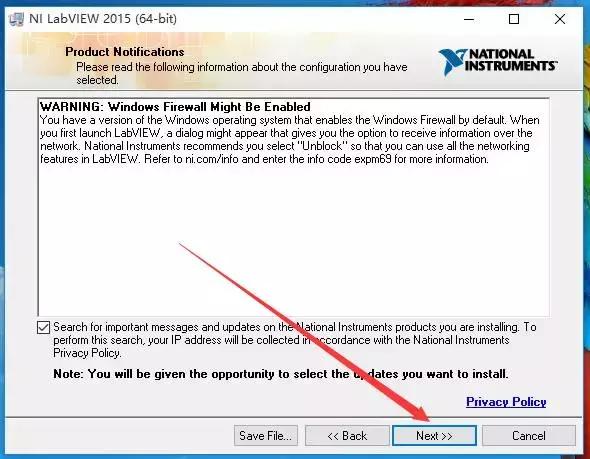
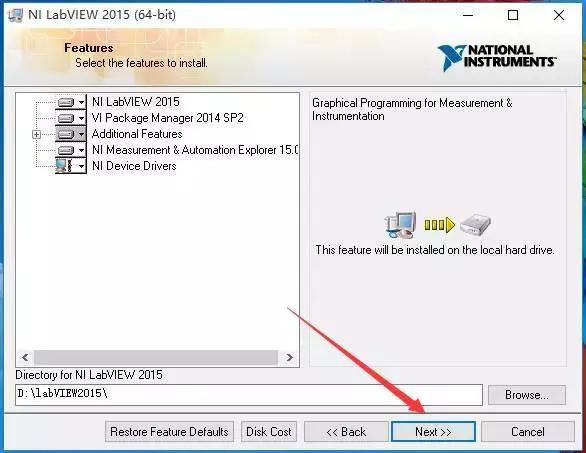
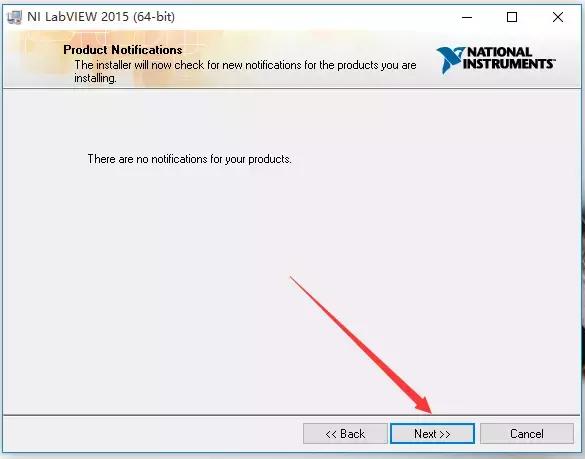
12、点击Next。
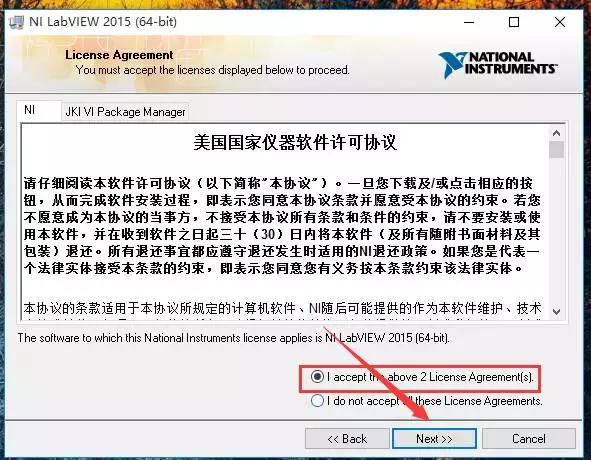
13、选中I accept the above 2该选项,然后点击Next。
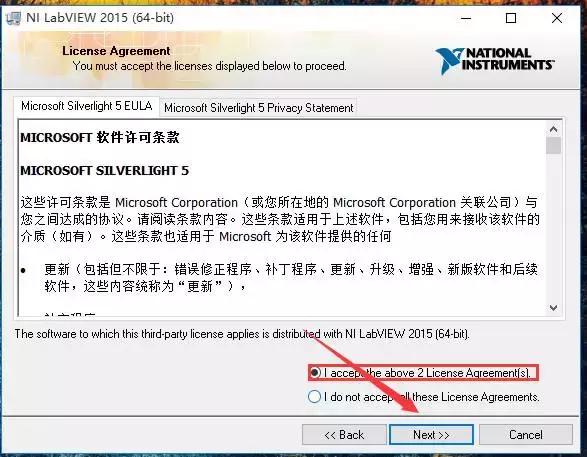
14、选中I accept the above 2该选项,然后点击Next。
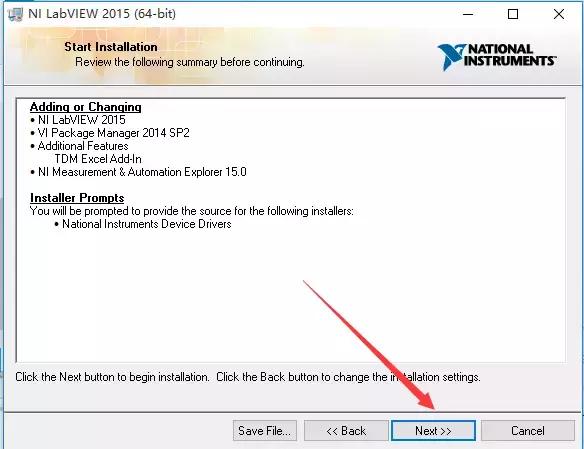
15、点击Next。
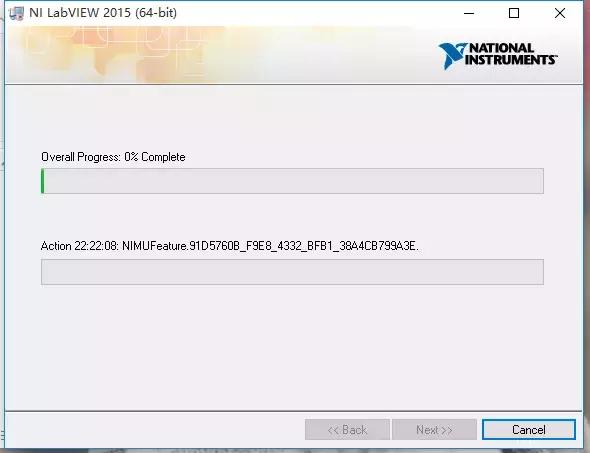
16、软件安装中(大约需要10分钟左右)。
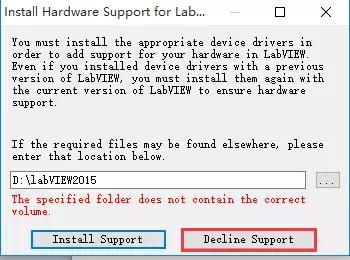
17、点击Decline Support。
18、点击Next。
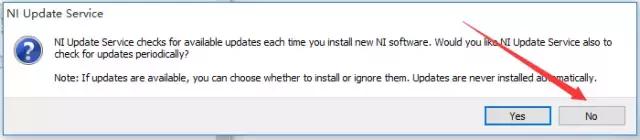
19、点击No。
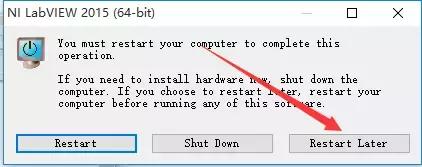
20、点击Restart Later。
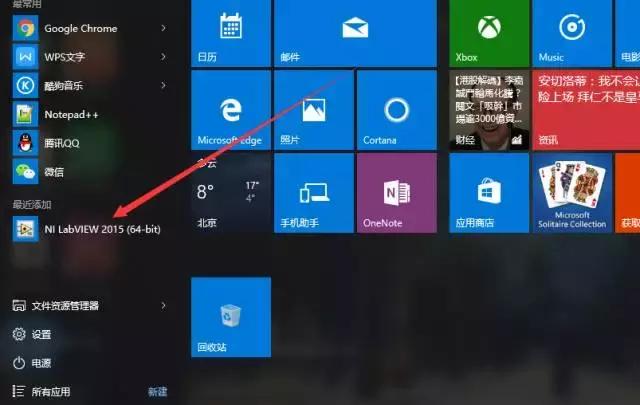
21、点击开始菜单栏找到该软件打开。
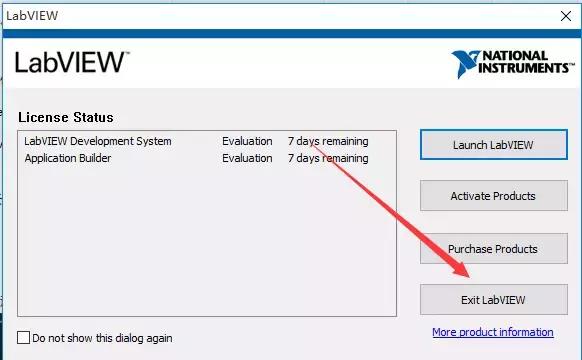
22、点击Exit LabVIEW。
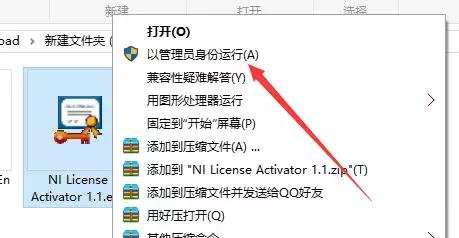
23、返回安装文件夹找到NI license activator 1.1文件,鼠标右击选择以管理员身份运行。
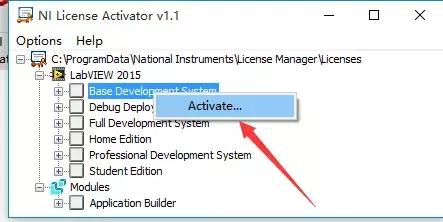
24、找到Base Development选项,右击Active。
25、点击Close。
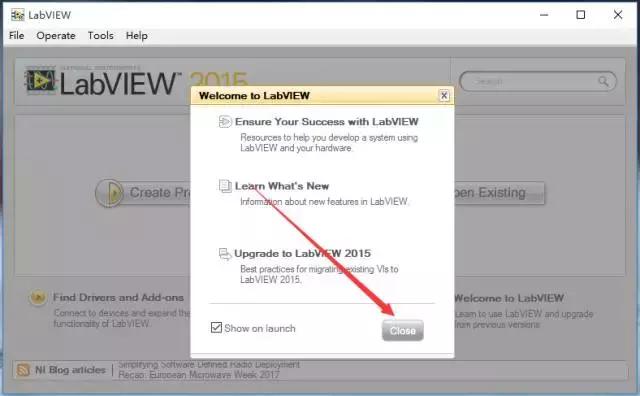
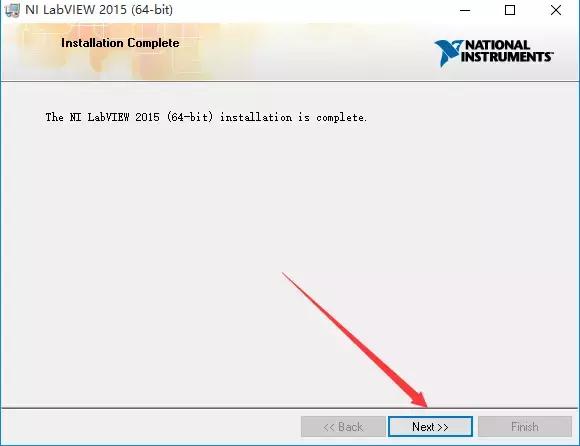
26、安装完成。
LabVIEW 2015是美国国家仪器(NI)公司最新开发的程序开发环境,他集成了工程师和科学家快速构建各种应用所需的所有工具,内置中文操作界面,可以帮助工程师完成从设计到测试等一系列步骤以及开发大中小型系统的图形化编程平台。新版LabVIEW 2015通过更快的速度、开发快捷方式和调试工具来帮助开发人员更高效地与所创建的系统进行交互,帮助您更高效地解决当今的问题以及应对未来不断变化的挑战,可帮助您更快速、更有效地解决当前的问题以及具备未来创新的能力。
软件介绍:
LabVIEW是一种图形化的编程语言的开发环境,它广泛地被工业界、学术界和研究实验室所接受,视为一个标准的数据采集和仪器控制软件,在LabVIEW编程环境程序员可以很容易地创建小型应用程序,可以用它来编写复杂的算法或大规模的代码,先进的LabVIEW开发系统提供了创建独立应用程序的可能性。
安装步骤:
1、右击软件压缩包,选择解压到LabVIEW2015。
2、鼠标右击选择打开2015LV-64WinEng.exe文件。
3、点击确定。
4、点击Browse解压文件。
5、点击确定
6、点击Next。
7、任意填写信息,点击Next。
8、点击Next。
9、点击Browse更改安装路径,建议安装到除C盘以外的磁盘,可在D盘或者其他盘创建一个2015LV-64WinEng文件夹。然后点击Next。
10、点击Next。
11、点击Next。
12、点击Next。
13、选中I accept the above 2该选项,然后点击Next。
14、选中I accept the above 2该选项,然后点击Next。
15、点击Next。
16、软件安装中(大约需要10分钟左右)。
17、点击Decline Support。
18、点击Next。
19、点击No。
20、点击Restart Later。
21、点击开始菜单栏找到该软件打开。
22、点击Exit LabVIEW。
23、返回安装文件夹找到NI license activator 1.1文件,鼠标右击选择以管理员身份运行。
24、找到Base Development选项,右击Active。
25、点击Close。
26、安装完成。