电脑动态IP地址怎么设置?本文分别介绍了在Windows XP、Windows 7和Windows 8的电脑下,配置自动获取IP地址和DNS服务器地址的设置方法。阅读学习本文后,用户可以更加容易、更加快速的完成路由器的安装与设置。
一、Windows XP动态IP设置
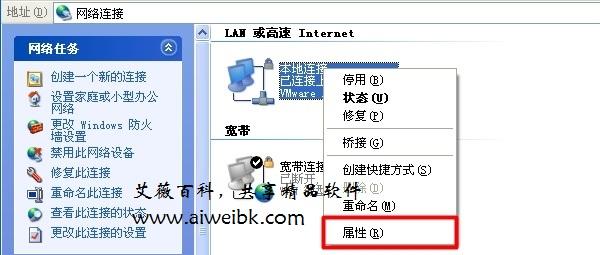
1、右击“网上邻居”点击属性

2、右击“本地连接”—>点击“属性”
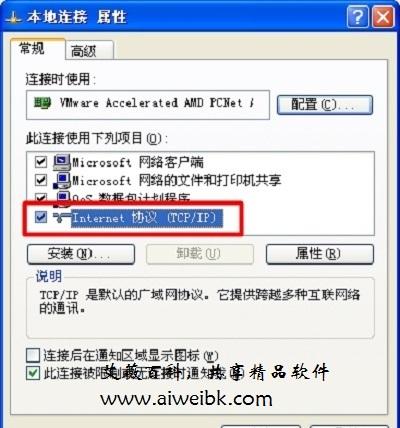
3、双击“Internet协议(TCP/IP)”
4、选择“自动获得IP地址”和“自动获得DNS服务器地址”,点击“确定”
二、Windows 7动态IP设置
1、右击”网络”选择”属性”.

2、点击“更改适配器设置”
3、右击”本地连接”选择”属性”
4、选择”Internet协议版本4(TCP/IPv4)”,并点击”属性”。
5、选择“自动获得IP地址”和“自动获得DNS服务器地址”,点击“确定”。
三、Windows 8动态IP设置
1、鼠标滑动栋桌面右下角,会出现如下图所示的界面,然后点击“设置”选项

2、在设置界面,点击“控制面板”选项
3、选择“网络和Internet”选项
4、点击“网络和共享中心”
5、点击“更改适配器设置”
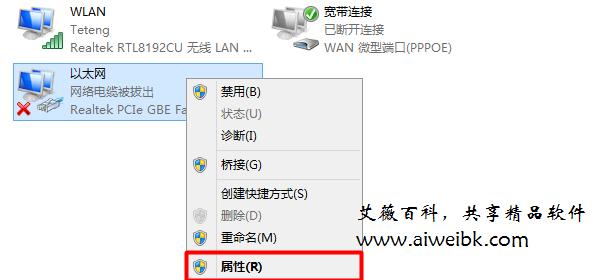
6、右击“以太网”选择“属性”
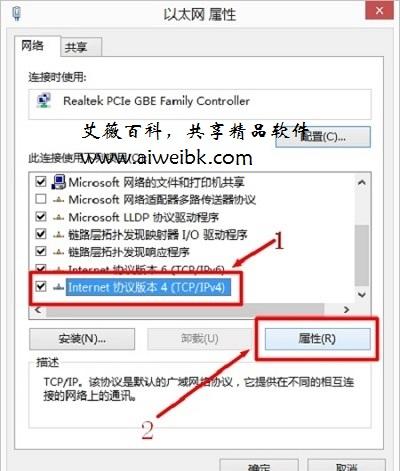
7、选择“Internet协议版本4(TCP/IPv4)”点击“属性”(或者双击“Internet协议版本4(TCP/IPv4)”)。
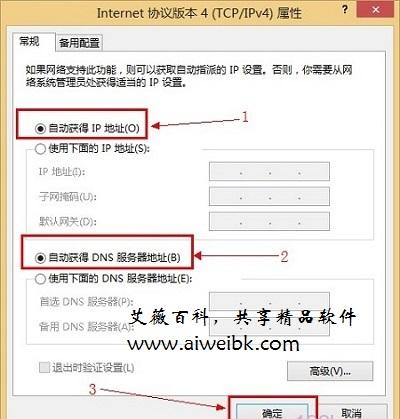
8、选择“自动获得IP地址”和“自动获得DNS服务器地址”,点击“确定”。
一、Windows XP动态IP设置
1、右击“网上邻居”点击属性
打开XP电脑上 网上邻居的 属性
2、右击“本地连接”—>点击“属性”
打开打开XP电脑上 本地连接 属性
3、双击“Internet协议(TCP/IP)”
双击“Internet协议(TCP/IP)”
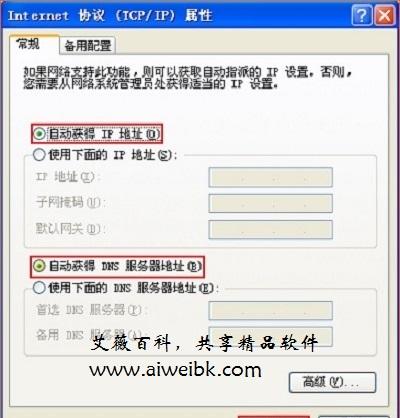
4、选择“自动获得IP地址”和“自动获得DNS服务器地址”,点击“确定”
XP电脑动态IP地址设置
二、Windows 7动态IP设置
1、右击”网络”选择”属性”.
打开Win7电脑上 网络 属性
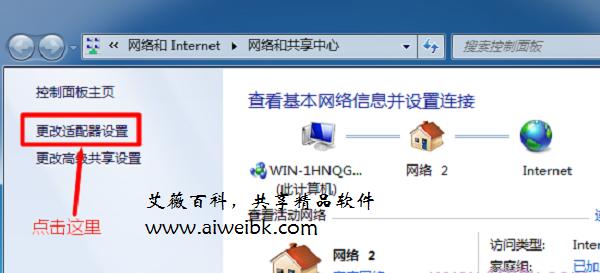
2、点击“更改适配器设置”
Win7电脑上点击“更改适配器设置”
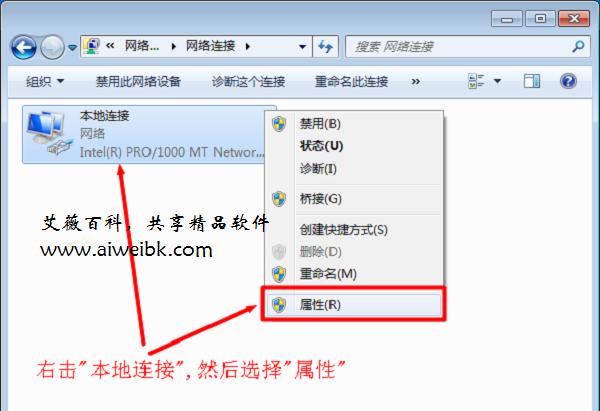
3、右击”本地连接”选择”属性”
Win7电脑上打开 本地连接 属性
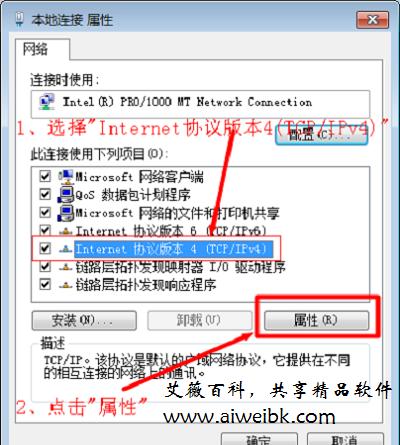
4、选择”Internet协议版本4(TCP/IPv4)”,并点击”属性”。
选择”Internet协议版本4(TCP/IPv4)”,并点击”属性”
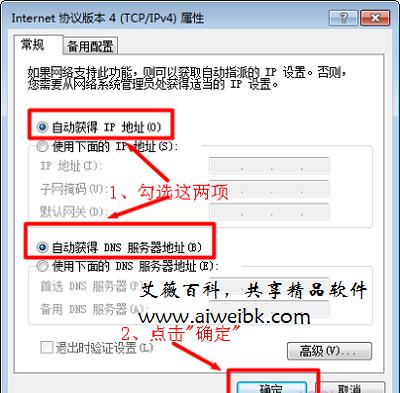
5、选择“自动获得IP地址”和“自动获得DNS服务器地址”,点击“确定”。
Win7电脑设置动态IP
三、Windows 8动态IP设置
1、鼠标滑动栋桌面右下角,会出现如下图所示的界面,然后点击“设置”选项
打开Win8电脑上的 设置
2、在设置界面,点击“控制面板”选项
打开Win8电脑上的 控制面板 选项
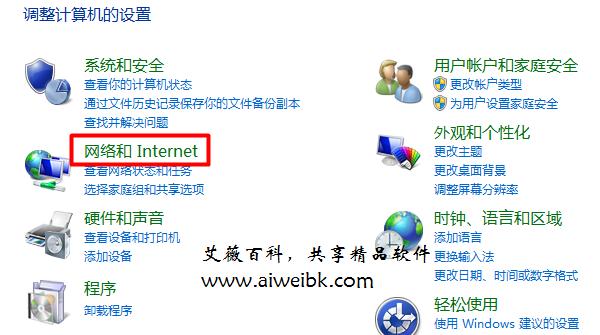
3、选择“网络和Internet”选项
打开Win8电脑上的 网络和Internet 选项
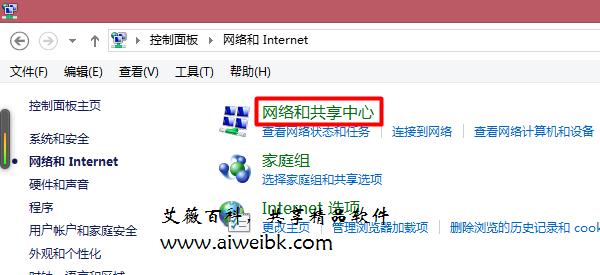
4、点击“网络和共享中心”
打开Win8电脑上的 网络和共享中心 选项
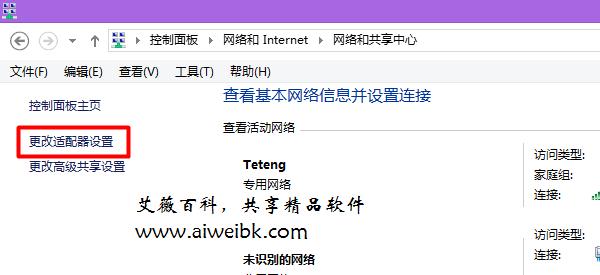
5、点击“更改适配器设置”
打开Win8电脑上的 更改适配器设置 选项
6、右击“以太网”选择“属性”
打开Win8电脑上的 以太网 属性
7、选择“Internet协议版本4(TCP/IPv4)”点击“属性”(或者双击“Internet协议版本4(TCP/IPv4)”)。
选择“Internet协议版本4(TCP/IPv4)”
8、选择“自动获得IP地址”和“自动获得DNS服务器地址”,点击“确定”。
Win8电脑设置动态IP